Port Manager
Overview
Port Manager gives you the ability to fine-tune the security of your RU Server setup by limiting the scope of communication ports.
Typical use
The most obvious use of Port Manager is to limit the ability to gain remote access to Hosts in a company network from the outside, while not restricting the ability to use Viewers to support remote computers outside the corporate network.
For example, a company wants to use Remote Utilities to support customers over the Internet and deploys RU Server as a routing server. The administrator is concerned that some employees might be able to install Host on their office computer, configure it to work with RU Server and gain access to their office computer from the outside.
This problem is easily solved by limiting the scope of a communication port and set it to accept connections from Viewer only. Technical support staff will still be able to remote into computers on the Internet using Viewer. However, unscrupulous employees who install Host on their office computer hoping to access it from the outside won't be able to connect, because RU Server won't let such connections pass through the communication port.
Using IP filtering—both global and port-specific—allows for even more granular control over connections passing through the server.
Open Port Manager
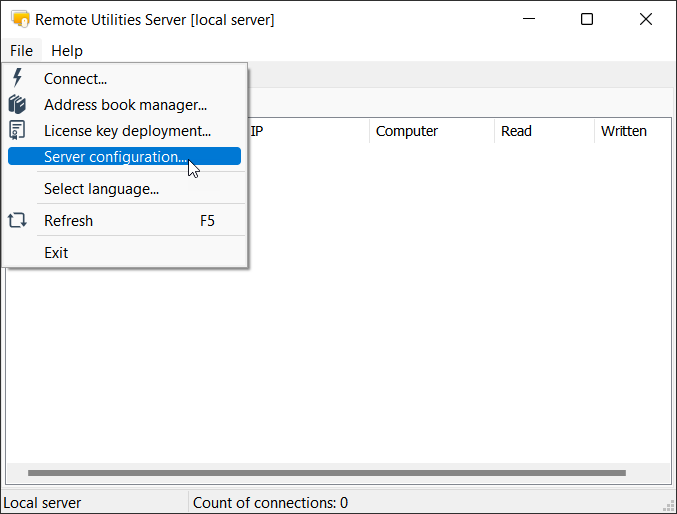
- In Admin Console go to File➝Server configuration:

Alternatively, go to Windows Start menu➝All apps➝Remote Utilities Server➝Configuration.
- Switch to the Communication tab and click Port manager.

- The Ports and IP filtering dialog will appear with the default communication port 5655 already added for you.

In the Ports and IP filtering dialog you can add new ports, edit existing ports, change their scope of work and set port-level IP filter rules.
Add new port
- In the Ports and IP filtering dialog click the plus icon.

- Specify port number, IP filter (optional, see further below), description and scope. For example, if you want this port to be used exclusively for communication with Viewer during an Internet-ID connection, select Internet-ID connection (Viewer side).

- Click OK and close the dialog.
- Restart the service: Open Server settings, go to the Service state tab, click Stop and then Start.
Add IP filter
In RU Server you can create global IP filter rules that apply to all RU Server communication and individual (port-level) IP filter rules for each communication port.
To avoid conflicts, if both IP filter types are used the following rules are applied in the listed order:
- Deny (blacklist) rules override allow (whitelist) rules.
- Global rules override port-level rules.
For example, if you blacklist an IP address in the Global filter and whitelist the same IP address in a port-level filter, the IP address will be denied (blocked).
If you whitelist an IP address in the Global filter and blacklist the same IP address in a port-level filter the IP address will still be blocked. This is because a port-level deny rule still overrides a global allow rule.
Add global IP Filter
To add global IP filter:
- In Admin Console go to File➝Server configuration:

Alternatively, go to Windows Start menu➝All apps➝Remote Utilities Server➝Configuration.
- Switch to the Communication tab and click Global IP-filter.

- Select the list that you want to populate and click the plus icon.

- Add items to the chosen list. This can be either a single IP address or an IP address range.

- You can add multiple IP addresses and IP address ranges and populate both lists.

- Select which list you want to use as your IP filter and click OK.

- Click OK in RU Server configuration window to close it.
Add port-level IP Filter
You can add an IP filter for each communication port in the Port Manager.
- In Admin Console go to File➝Server configuration:

Alternatively, go to Windows Start menu➝All apps➝Remote Utilities Server➝Configuration.
- Switch to the Communication tab and click Port manager.

- Click the plus icon if you need to create a new port or select an existing port from the list and click the Edit icon.

- Click IP-filter.

- The rest of the process is the same as in steps 3-6 described in the "Add global IP filter" above.